Ametnes Expenses Module - Creating an expense#
Navigate to Expenses: As shown in the image below. Typically, you'd access this from the main Odoo menu by selecting the "Expenses" application and then clicking New
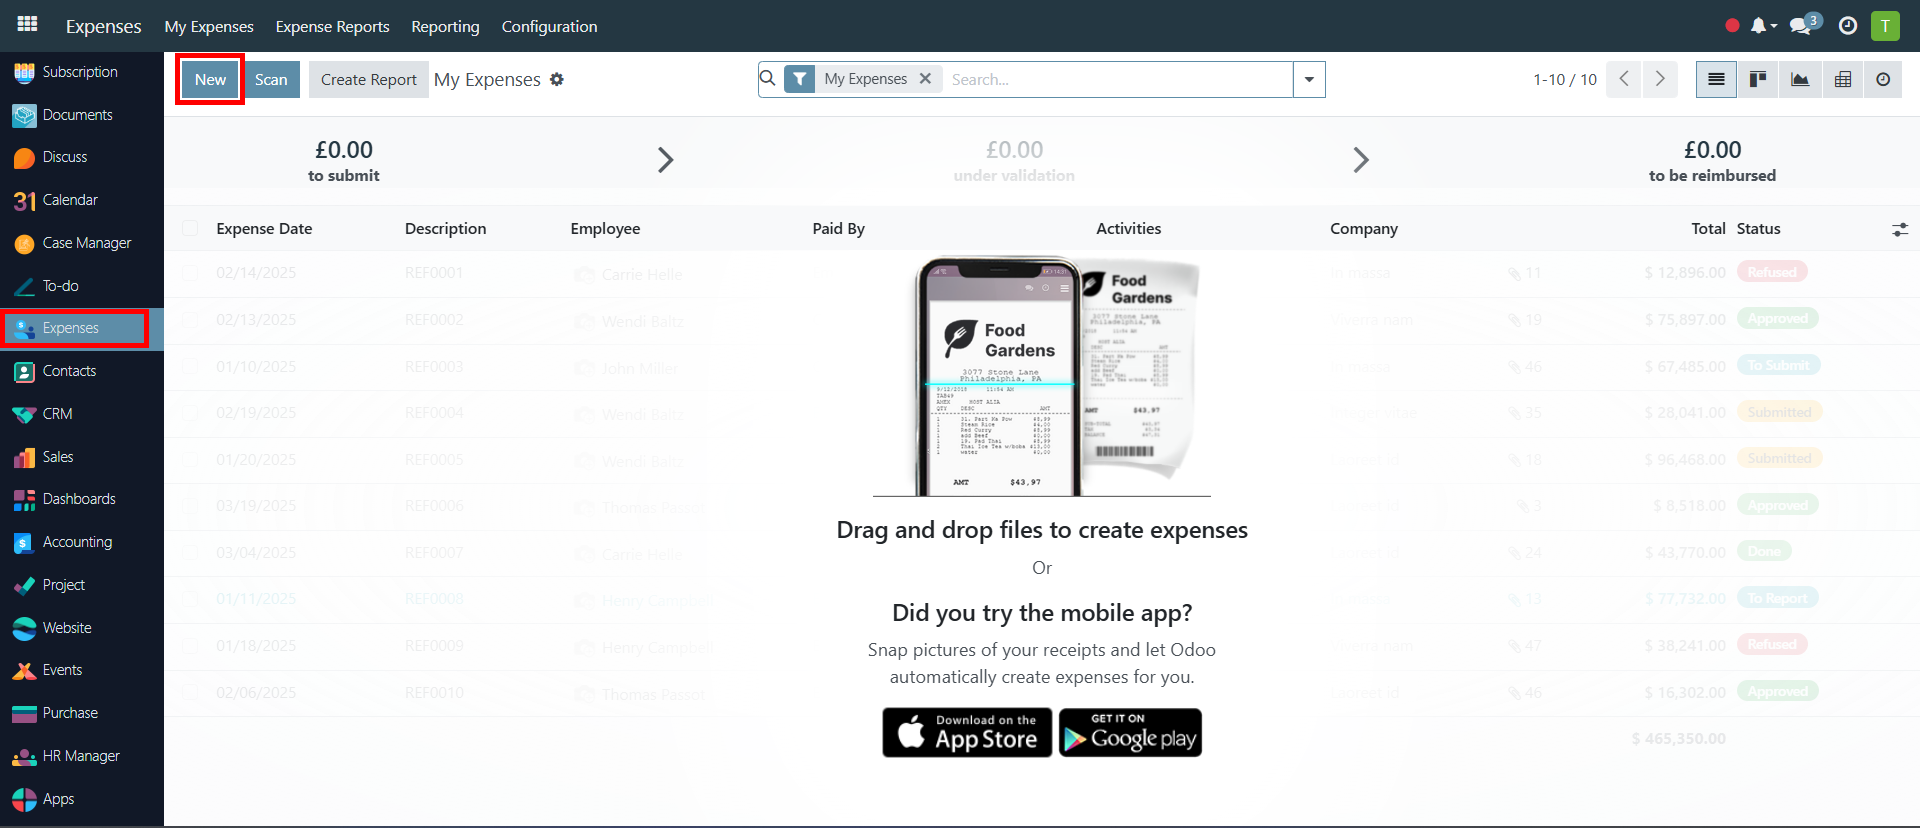 Create a New Expense: Click the "New" button . This will open a blank expense form similar to the one in the image.
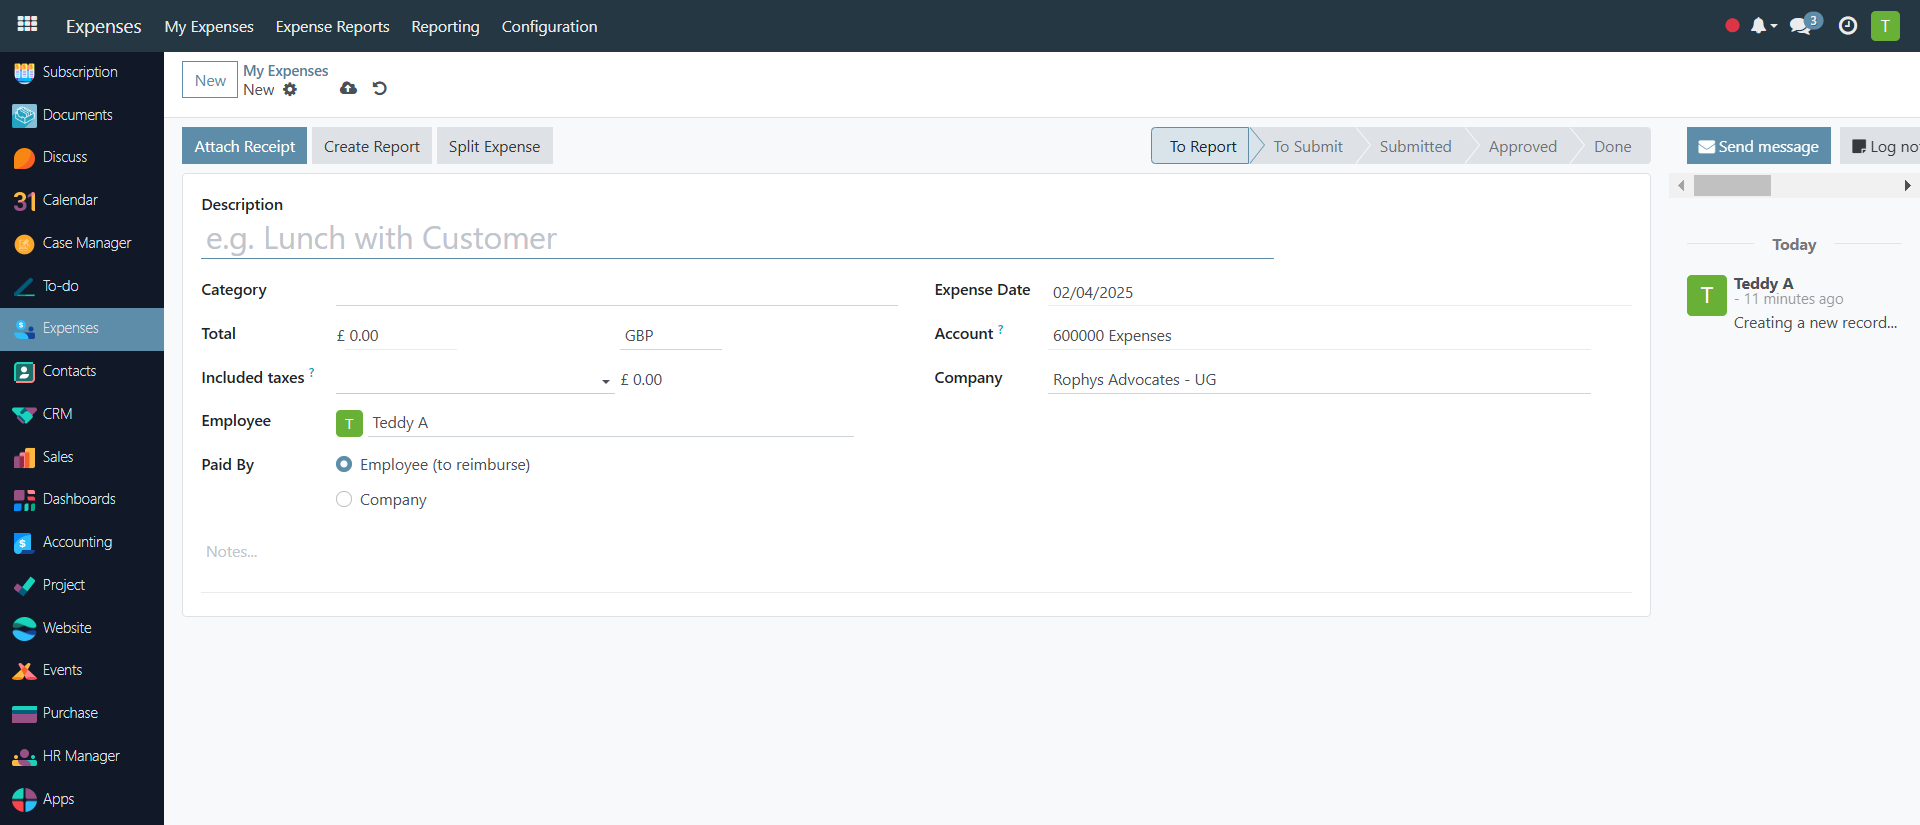
Fill in the Expense Details:
- Description: Enter a clear and concise description of the expense. (e.g., "Lunch with Client" ).
- Category: Select the appropriate expense category from the dropdown. This categorizes the expense for reporting and accounting purposes. (e.g., "[FOOD] Meals" ).
- Expense Date: Enter the date the expense was incurred. (e.g., 01/31/2025).
- Account: Choose the relevant accounting account. This determines how the expense is recorded in your financial statements. (e.g., "1023300 DFCU New account").
- Total: Enter the total amount of the expense.
- Included Taxes? Specify if the total includes taxes. If yes, enter the tax percentage. Odoo will calculate the tax amount automatically. (e.g., 15% tax resulting in $74.35).
- Employee: Select the employee who incurred the expense. This is usually pre-filled with the logged-in user.
- Paid By: Indicate whether the expense was paid by the employee (and needs reimbursement) or by the company directly. (e.g., "Employee (to reimburse)").
- Customer to Reinvoice: If the expense is billable to a customer, select the customer here.
- Analytic Distribution: If applicable, allocate the expense to a specific project, cost center, or analytic account.
- Company: Select the company the expense belongs to, especially important in multi-company setups. Notes: Add any relevant notes or comments about the expense.
The system automatically saves once all the required fields have been added.
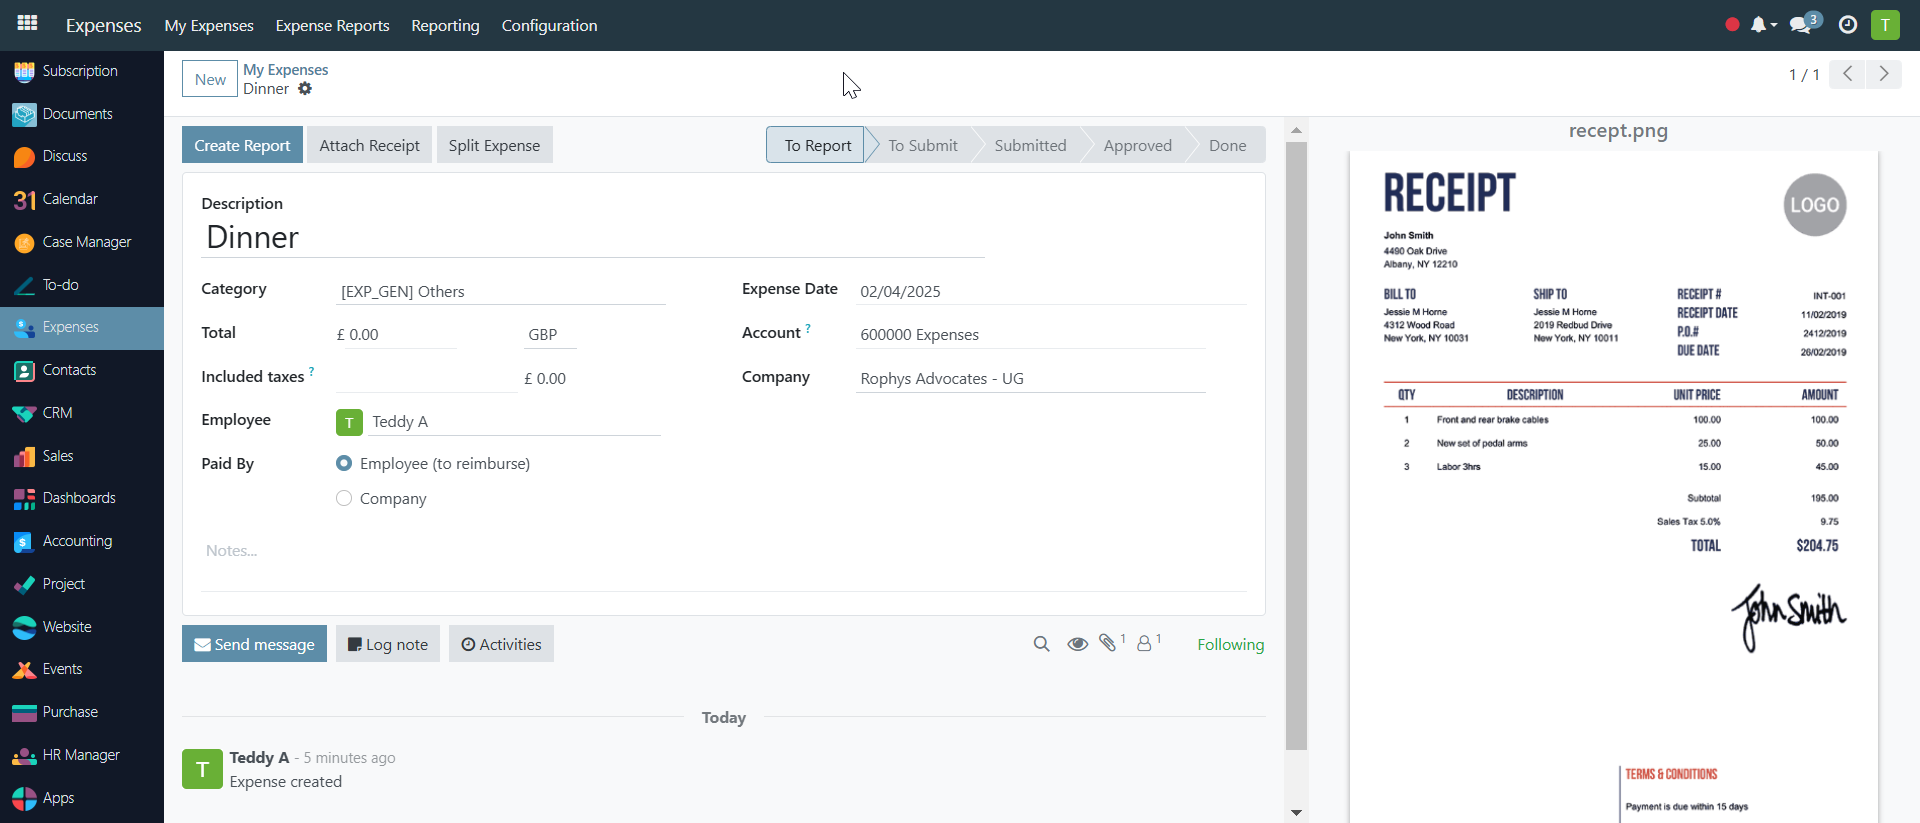
Locating the "Attach Receipt" Option#
On the Expense Form: With the expense form open, look for the Attach Receipt button or a similar prompt. In this specific screenshot, the button is clearly visible at the top of the form, between New and Create Report.
Step 2: Choosing Your Attachment Method
Click Attach Receipt: Click the Attach Receipt button. This will typically present you with the option to:
-
Upload from your computer: Select this to browse your local files and choose a scanned copy or photo of the receipt saved on your computer or device.
-
Selecting and Attaching the Receipt File
-
Choose the file: If you chose "Upload from your computer," a file browser window will open. Navigate to the location of your receipt image and select it. Supported file types are usually common image formats like JPG, PNG, and PDF.
- Confirm: After selecting the file, click
Openor the equivalent to confirm the attachment. - Verifying the Attachment
Check the attachment: Once the receipt is uploaded, the expense form should visually indicate that a file has been attached. There is a thumbnail of the image on the right of the form.
Once the image has been successfully uploaded, click the:
1. Create ReportButton: This indicates the next logical step in the expense workflow. Clicking this adds the expense to an expense report (if you're grouping multiple expenses together for submission).
Once you are done creating a report. 1. Editing Report Details: You can likely edit the report name to something more descriptive if needed.
- Submitting the Report: Once you've added all relevant details, you'll typically have an option to submit the report for approval. This button is labelled "Submit to Manager" (as shown below).
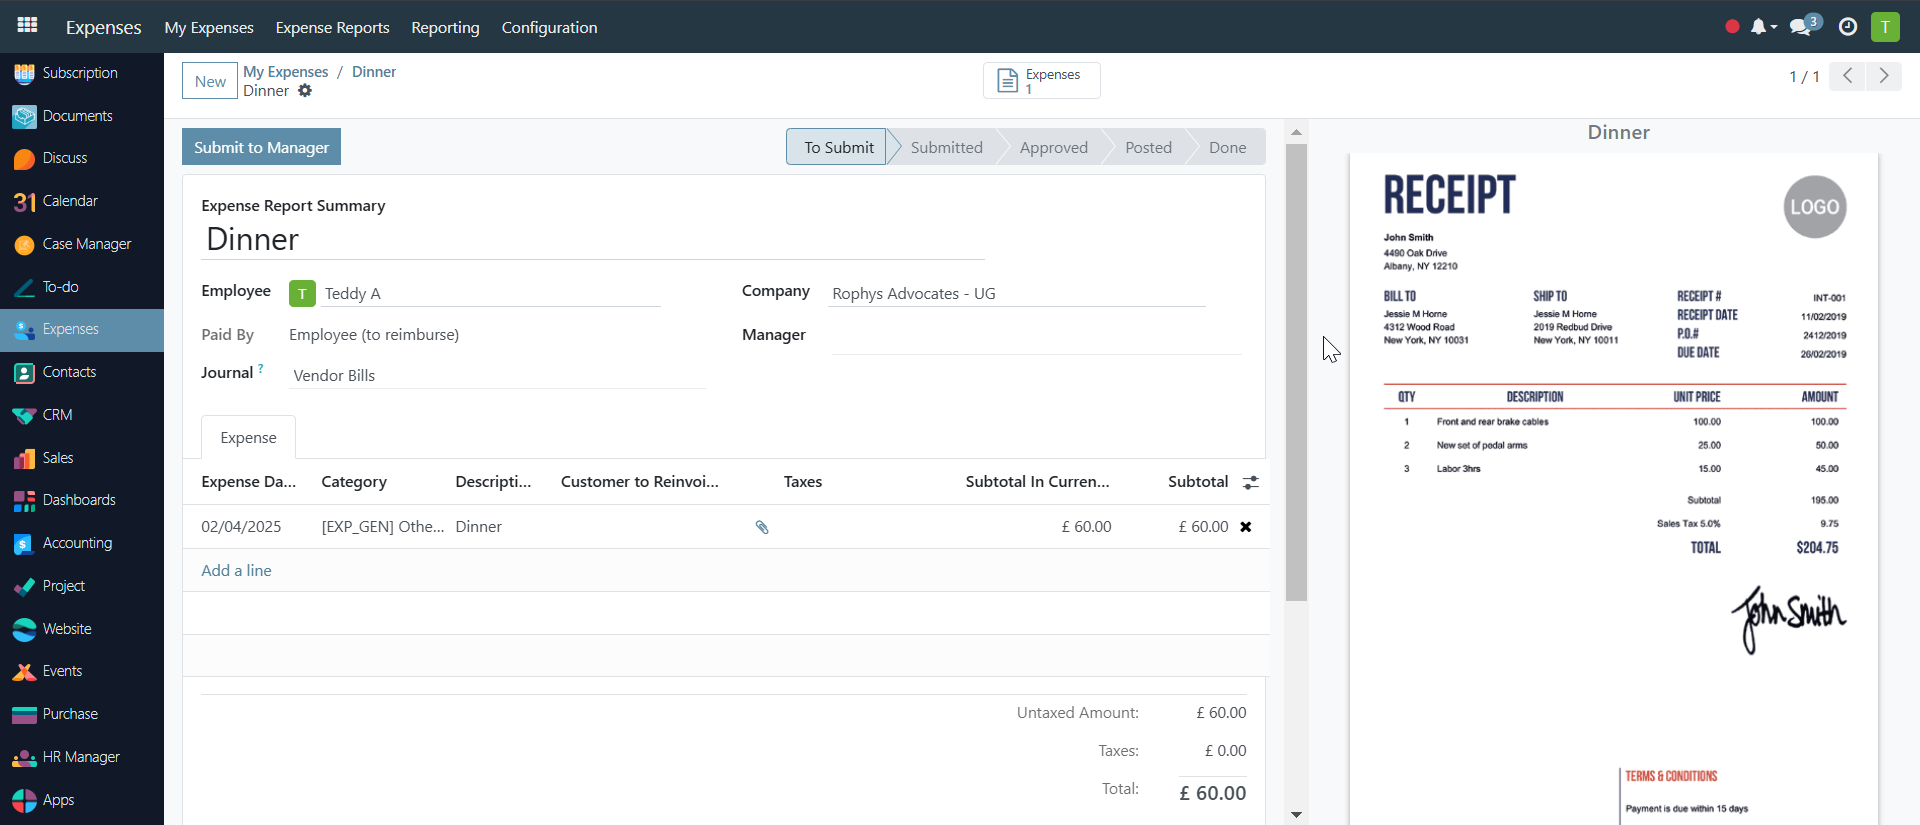 Note that the statuses, remain
 To Submit,Submitted,Approved,Posted,Done
What Happens After Submission#
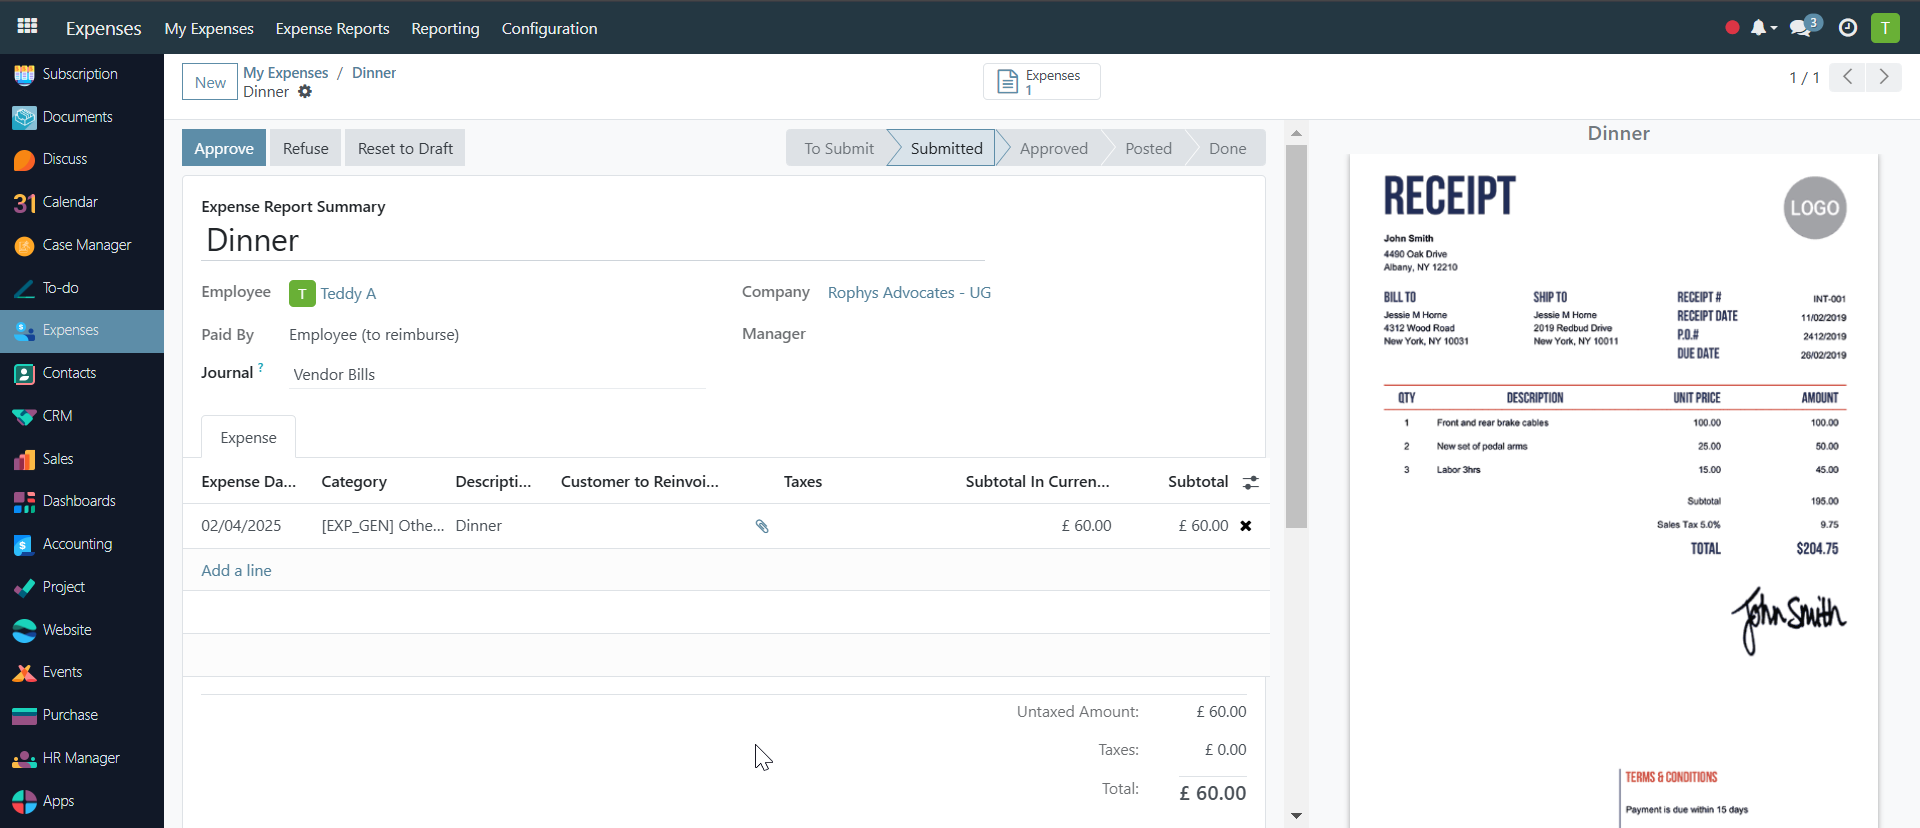
- Status Change: The expense report's status changes from "To Submit" to "Submitted," as indicated by the highlighted button in the workflow status area. This visually confirms that the report has been successfully submitted.
- Manager Notification: The designated manager (or approver) for this expense report will receive a notification (either within Odoo or via email) that a new expense report awaits their approval. The notification contains information about the report, such as the employee's name and the total amount.
- Workflow Options Update: The available workflow buttons change after submission. In the screenshot, we see options like "Approve," "Refuse," and "Reset to Draft." These options will typically be visible to the manager but not the employee who submitted the report.
After the Manager Approves#
Manager Action: The manager, having reviewed the expense report and attached receipts, clicks the "Approve" button (as seen above).
- Status Change: The expense report status updates to "Approved," as highlighted by the active
Approvedbutton in the workflow status area. This clearly indicates the report has been approved. -
Accounting Entries: Depending on your Odoo configuration, the approval automatically triggers the creation of accounting entries to record the expense in your general ledger. The
Post Journal Entriesbutton (highlighted in the image) suggests that this step require manual confirmation and the entries are ready to be posted.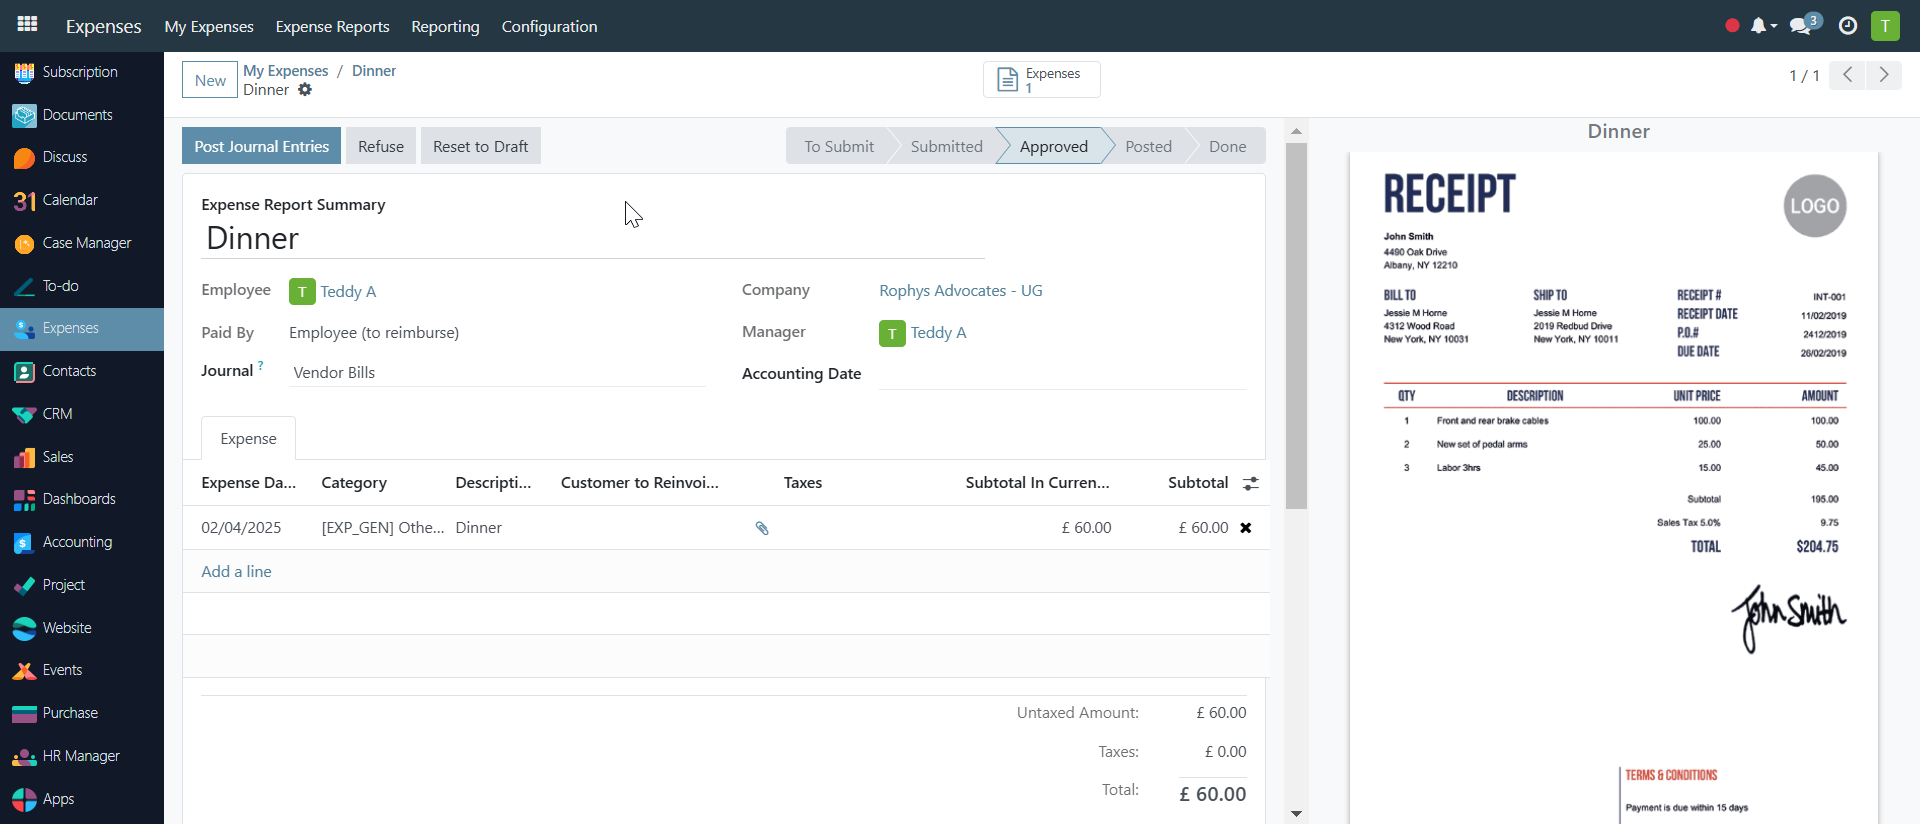
-
Workflow Options Update: The available workflow buttons change. In the screenshot, we see options like "Post Journal Entries," "Refuse," and "Reset to Draft." The "Post Journal Entries" button indicates that the next step is to finalize the accounting aspect of the approved expense. "Refuse" and "Reset to Draft" are for exceptional cases where the approval needs to be reverted.
Posting Journal Entries#
The expense report status updates to Posted, as indicated by the highlighted Posted button in the workflow status area. This confirms that the accounting entries have been created and the expense is now formally recorded in your financial records.
-
Journal Entry Creation: Odoo automatically generates journal entries to reflect the expense. While the specific journal entries are not directly visible in the screenshot, they would typically:

-
Debit: The appropriate expense account (based on the expense category).
- Credit: The payable account (if the employee is to be reimbursed) or the payment account (if the company paid directly).
- Payment Options: After posting journal entries, the next step is usually to reimburse the employee (if applicable). The screenshot shows a "Register Payment" button, suggesting that the system is ready for you to record the reimbursement.
Workflow Options Update: The available workflow buttons change. In the screenshot, we see options like "Register Payment," "Refuse," and "Reset to Draft." "Register Payment" leads to recording the reimbursement, while "Refuse" and "Reset to Draft" are likely for exceptional cases where the posting needs to be reverted.
Locate and click the "Register Payment" button.
A pop-up window titled "Register Payment" will appear, as shown in the screenshot. This form contains the following key information:
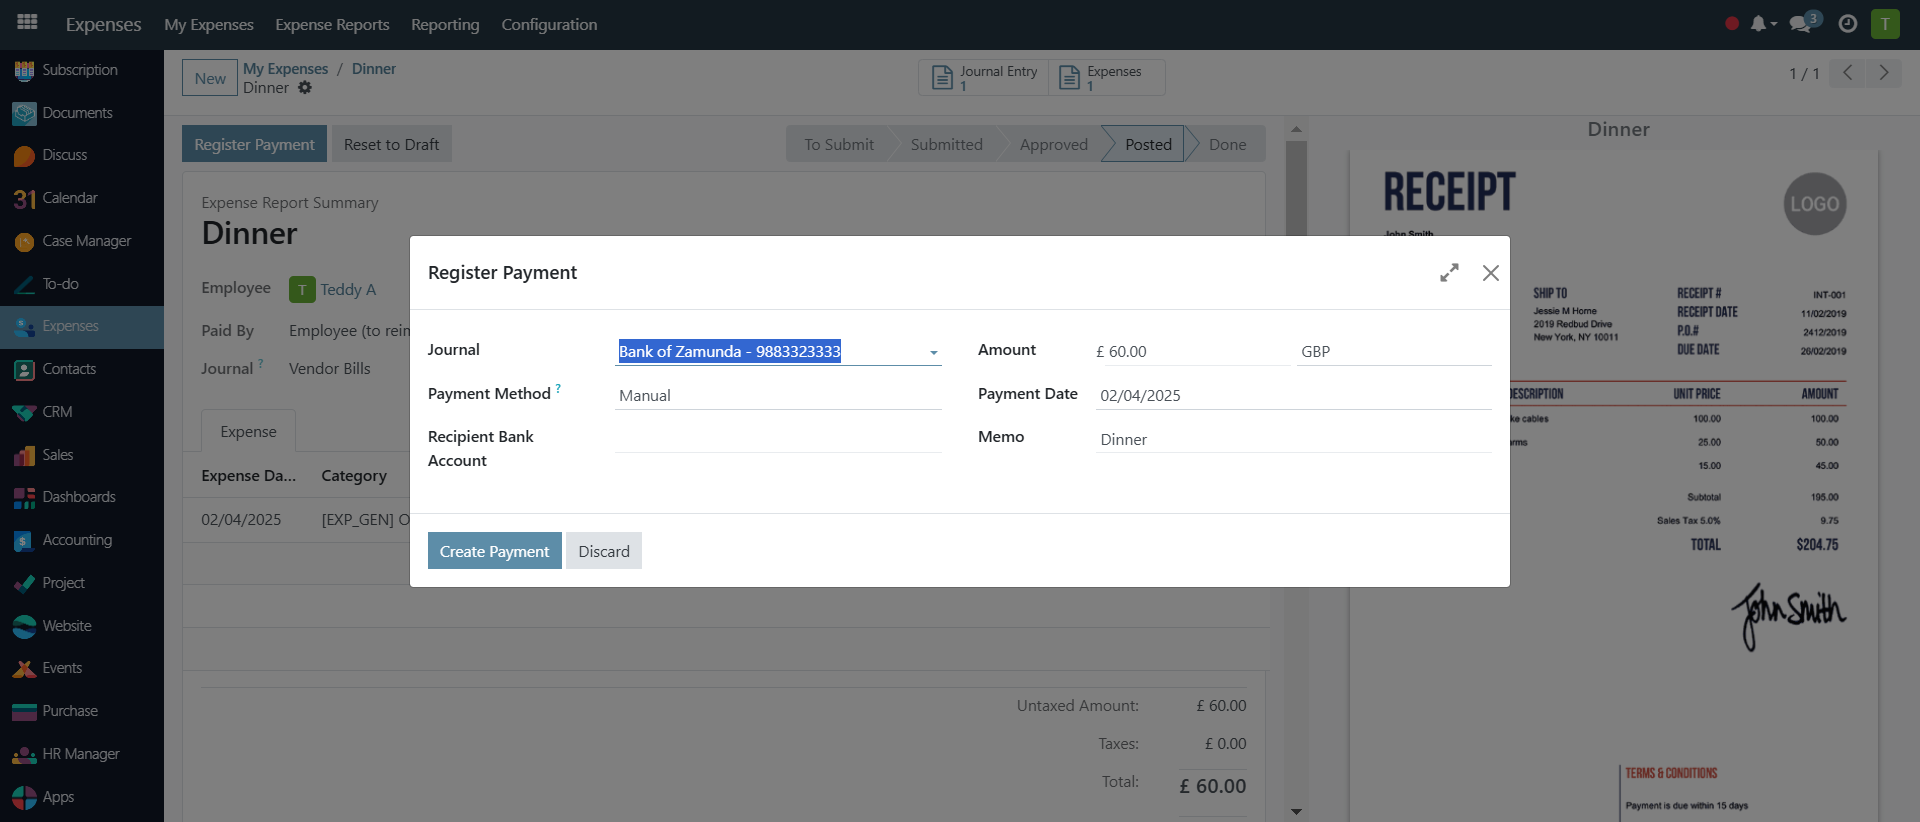
- Journal: The journal to be used for the payment (e.g., "Bank" or "Cash").
- Payment Method: The method of payment (e.g., "Manual," "Check," "Electronic Transfer").
- Recipient Bank Account: The employee's bank account details (if applicable). This has pre-filled based on employee information.
- Amount: The amount to be paid. This should default to the total amount of the approved expense report.
- Payment Date: The date the payment was made or will be made. The screenshot shows "02/04/2025," which is likely the same date as the expense.
- Memo: A field for adding a memo or reference to the payment (e.g., "Expense Report Reimbursement").
Completing the Payment Registration
- Carefully review all the pre-filled information in the
Register Paymentform, especially the amount and payment method. - Make any necessary changes to the payment details (e.g., change the payment method or date if required).
- Create Payment: Click the "Create Payment" button to confirm and record the payment.
After you have successfully filled in the "Register Payment" form and clicked "Create Payment"
The expense report status updates to Done, as indicated by the highlighted Done button in the workflow status area. This clearly signifies that the entire expense process, including payment, is complete.

In Payment Badge: A green IN PAYMENT badge is displayed on the expense report. This serves as a visual cue that the reimbursement is currently being processed or has been processed.
The Done status, along with the "IN PAYMENT" badge, provides a clear indication that the expense has been fully processed and paid. This concludes the expense report cycle
Filters and Grouping under Expense reports:
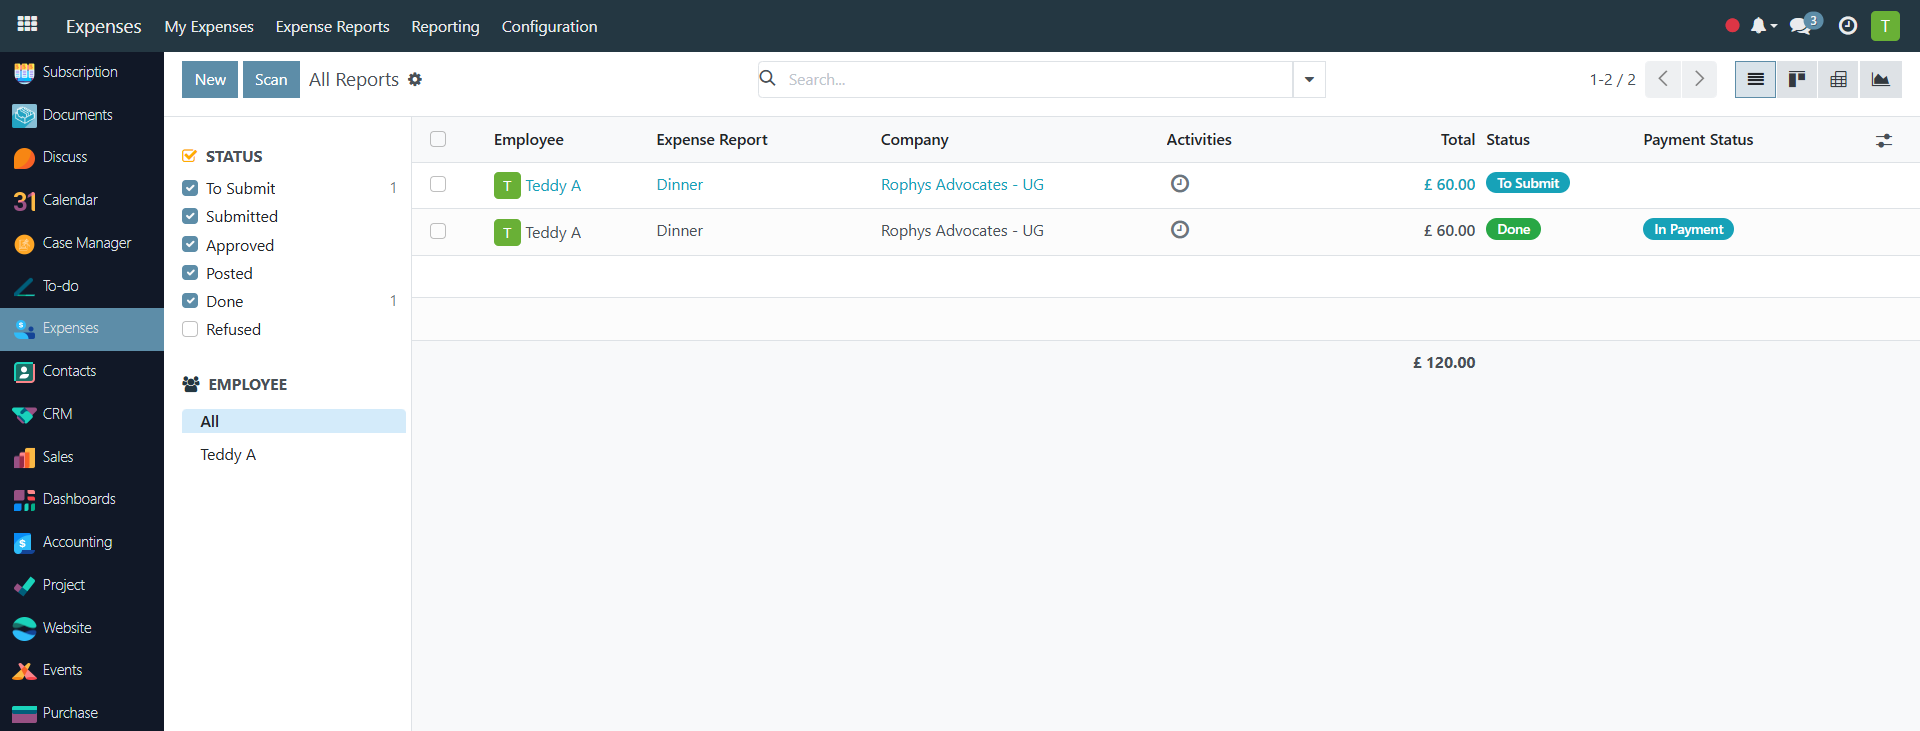
- A filter on the left allows you to view expense reports based on their status (To Submit, Submitted, Approved, Posted, Done, Refused, Reload). This helps in managing and tracking reports at different stages.
- Another filter to view reports by specific employees. Search Bar: Enables searching for specific reports using keywords.
Pre-Configuration Steps (Expense Categories)#
Before effectively using the Odoo Expenses module, it's crucial to configure essential elements that will streamline expense tracking and reporting. This document outlines the pre-configuration steps, specifically focusing on setting up Expense Categories
Access the Expenses App: From your Odoo dashboard, click on the "Expenses" application icon.

-
Go to Configuration: In the Expenses app, click on the "Configuration" menu.
-
Select Expense Categories: From the dropdown menu under "Configuration," choose "Expense Categories." This will open the view shown in the provided screenshot, displaying a list of pre-defined expense categories (if any). Creating New Expense Categories:
-
Click "New": To create a new expense category, click the "New" button located at the top left of the "Expense Categories" view.
-
Fill in the Details: A new form will open, allowing you to input the necessary information for the expense category:
-
Name: Enter a descriptive name for the category (e.g., "Software Subscription," "Office Supplies").
-
Save: Click the "Save" button to create the new expense category.