Horilla HR System - User Manual#
Employee Settings#
Work Type#
Accessing Work Type Settings#
- Navigate to Settings → Employee → Work Type
- The system displays the Work Type page with existing work types listed (Part-time, Full-time)
Creating a New Work Type#
- Click the red
"Create"button in the top-right corner -
Enter the work type name in the provided field
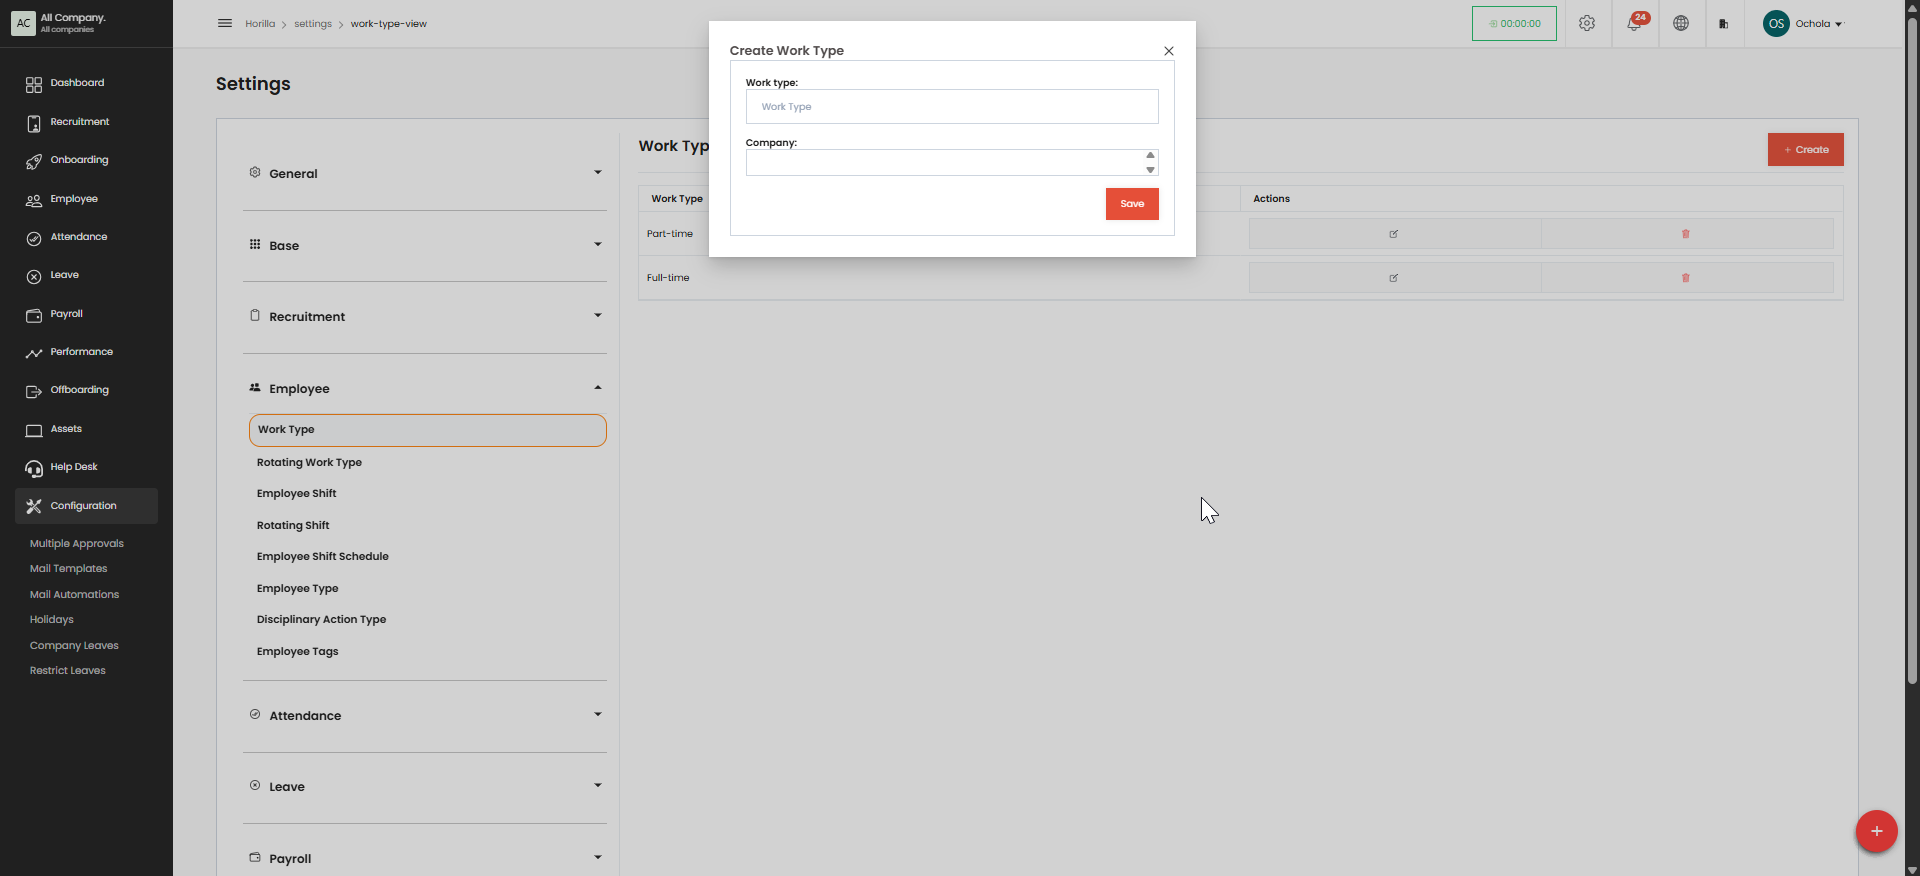
-
Click
"Save"to create the new work type
Managing Work Types#
- Edit a Work Type:
- Locate the work type in the list
- Click the pencil (edit) icon in the Actions column
- Update the information as needed
- Click
"Save"to confirm changes - Delete a Work Type:
- Locate the work type in the list
- Click the trash (delete) icon in the Actions column
- Confirm deletion when prompted
Important Notes#
- Default work types (Part-time, Full-time) may be required by the system
- The system displays the work types in a table format with two columns: Work Type and Actions which include editing the worktype
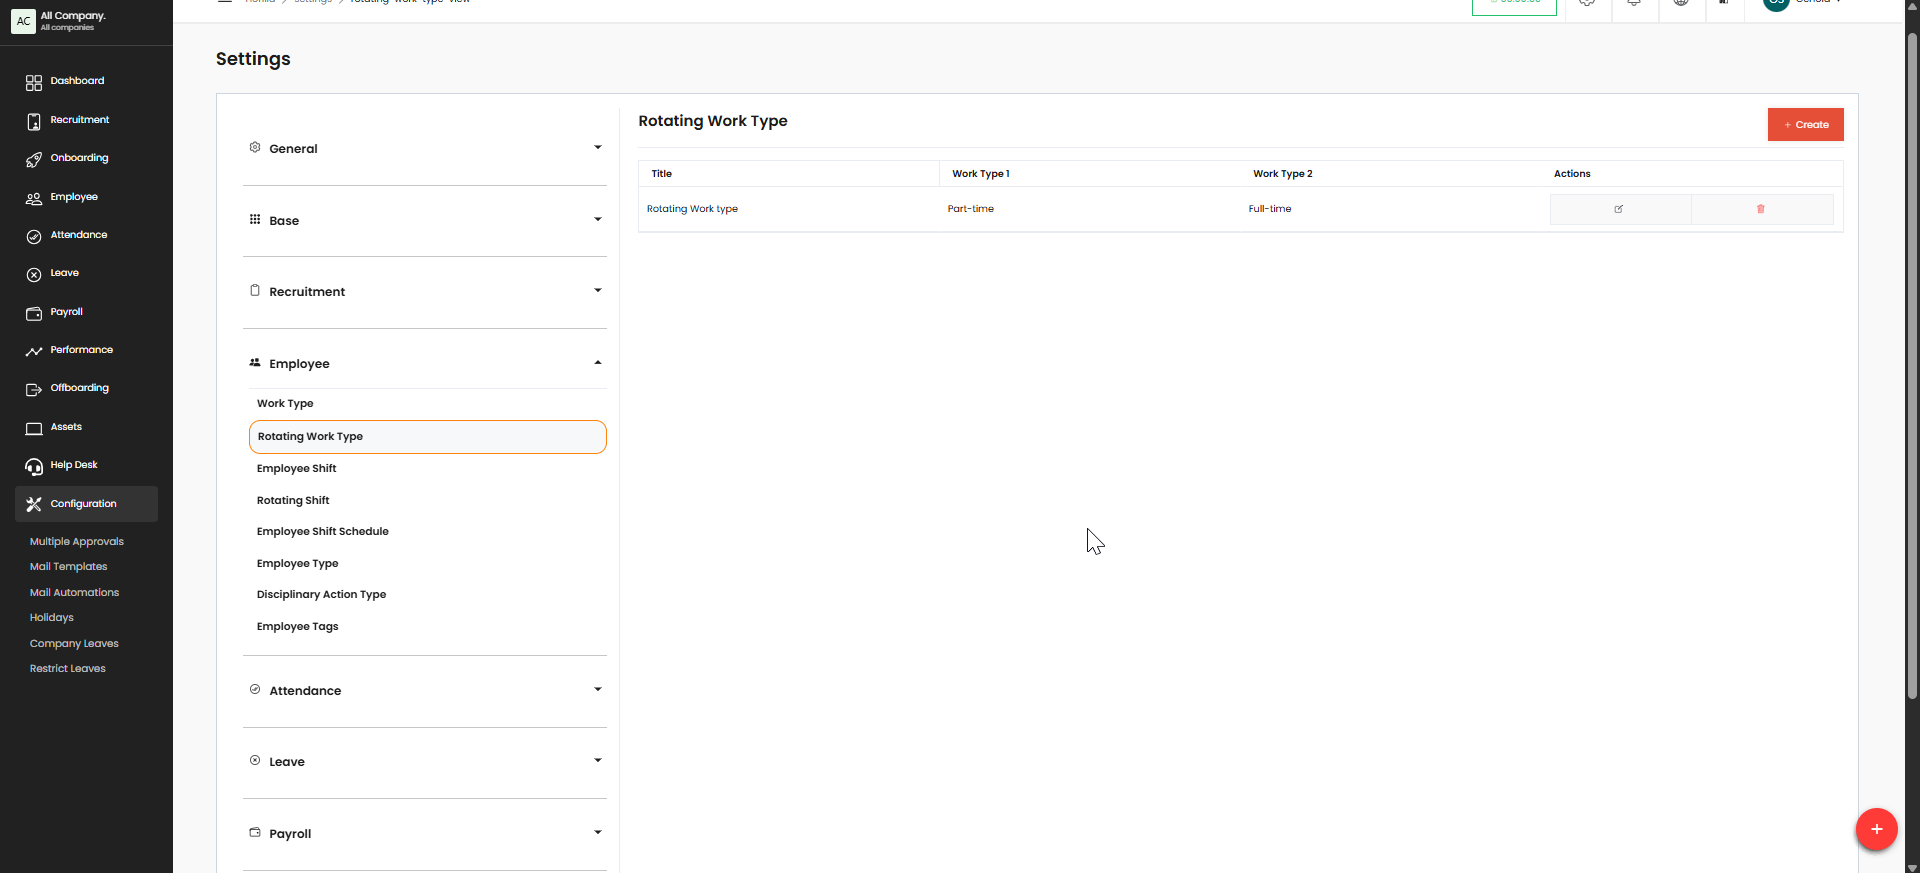
Rotating Work Type#
Accessing Rotating Work Type Settings#
- Navigate to Settings → Employee → Rotating Work Type
- The system displays the Rotating Work Type page with any existing rotating work types
Creating a New Rotating Work Type#
- Click the red
"Create"button in the top-right corner -
A "Create Rotating Work Type" popup window will appear
-
Fill in the required fields:
- Name: Enter a name for the rotating work type
- Work Type 1: Select a work type from the dropdown (e.g., Part-time)
- Work Type 2: Select another work type from the dropdown (e.g., Full-time)
- Click "Add more work types" (green text link) if you need to add additional work types to the rotation
- Click the red
"Save"button at the bottom of the popup
Managing Rotating Work Types#
- View Rotating Work Types:
- The system displays rotating work types in a table with columns for Title, Work Type 1, Work Type 2, and Actions
- Edit a Rotating Work Type:
- Locate the rotating work type in the list
- Click the pencil (edit) icon in the Actions column
- Update the information as needed
- Click
"Save"to confirm changes - Delete a Rotating Work Type:
- Locate the rotating work type in the list
- Click the trash (delete) icon in the Actions column
- Confirm deletion when prompted
Important Notes#
- Rotating work types allow employees to alternate between different work types
- This feature is useful for flexible work arrangements or shift rotations
- The system requires at least two work types for rotation
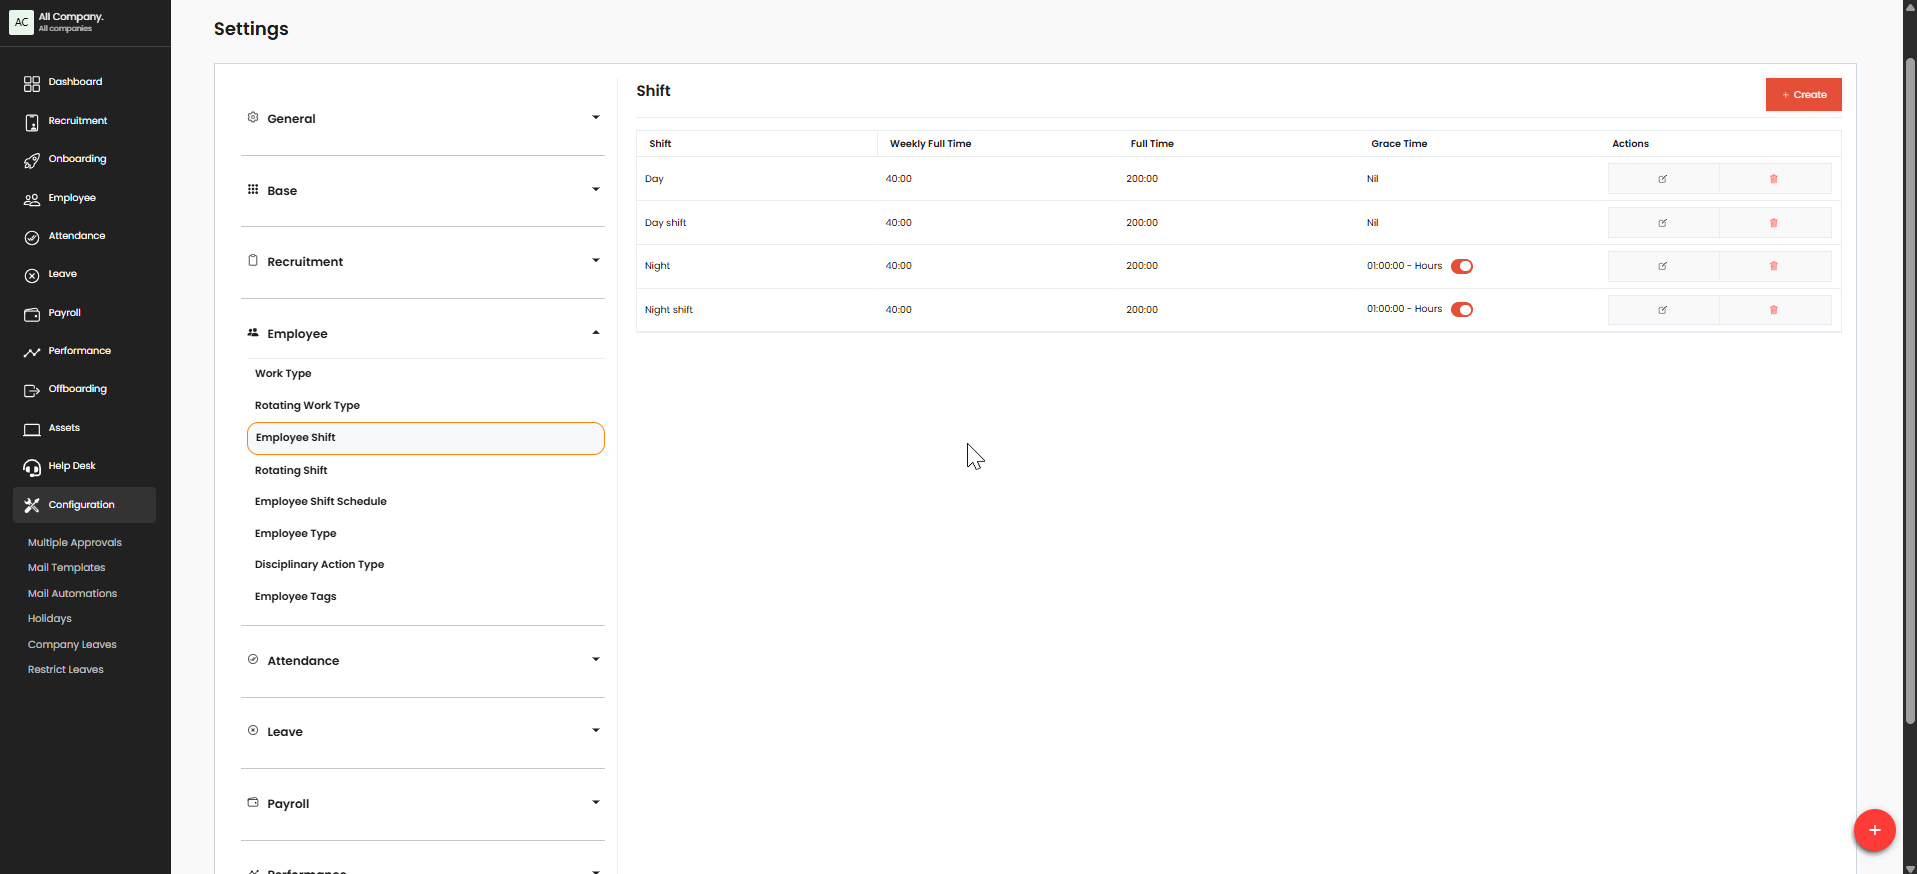
Employee Shift#
Accessing Employee Shift Settings#
- Navigate to Settings → Employee → Employee Shift
- The system displays the Shift page with existing shifts listed
Understanding the Shift Table#
The shift table displays the following columns: - Shift: Name of the shift (e.g., Day, Day shift, Night, Night shift) - Weekly Full Time: Hours required per week (e.g., 40:00) - Full Time: Total hours (e.g., 200:00) - Grace Time: Allowable time buffer for clock-in/out (e.g., Nil or 01:00:00 - Hours) - Actions: Edit and delete options
Creating a New Shift#
- Click the red "Create" button in the top-right corner
- Enter the following information:
- Shift Name (e.g., Evening, Weekend)
- Weekly Full Time hours
- Full Time hours
-
Grace Time
-
Click "Save" to create the new shift
Managing Shifts#
- Edit a Shift:
- Locate the shift in the list
- Click the pencil (edit) icon in the Actions column
- Update shift details as needed
- Click "Save" to confirm changes
- Delete a Shift:
- Locate the shift in the list
- Click the trash (delete) icon in the Actions column
- Confirm deletion when prompted
Important Notes#
- Grace Time can be set to "Nil" or a specific time period (e.g., "01:00:00 - Hours")
- Night shifts typically have Grace Time enabled (toggle switch is on)
- Day shifts typically have Grace Time disabled (toggle switch is off)
- The system uses these shift definitions for attendance tracking and payroll calculations
Rotating Shift#
Accessing Rotating Shift Settings#
- Navigate to Settings → Employee → Rotating Shift
Creating a New Rotating Shift#
- Click the "Create" button
- Define the following:
- Rotation Name
-
Shifts included in the rotation
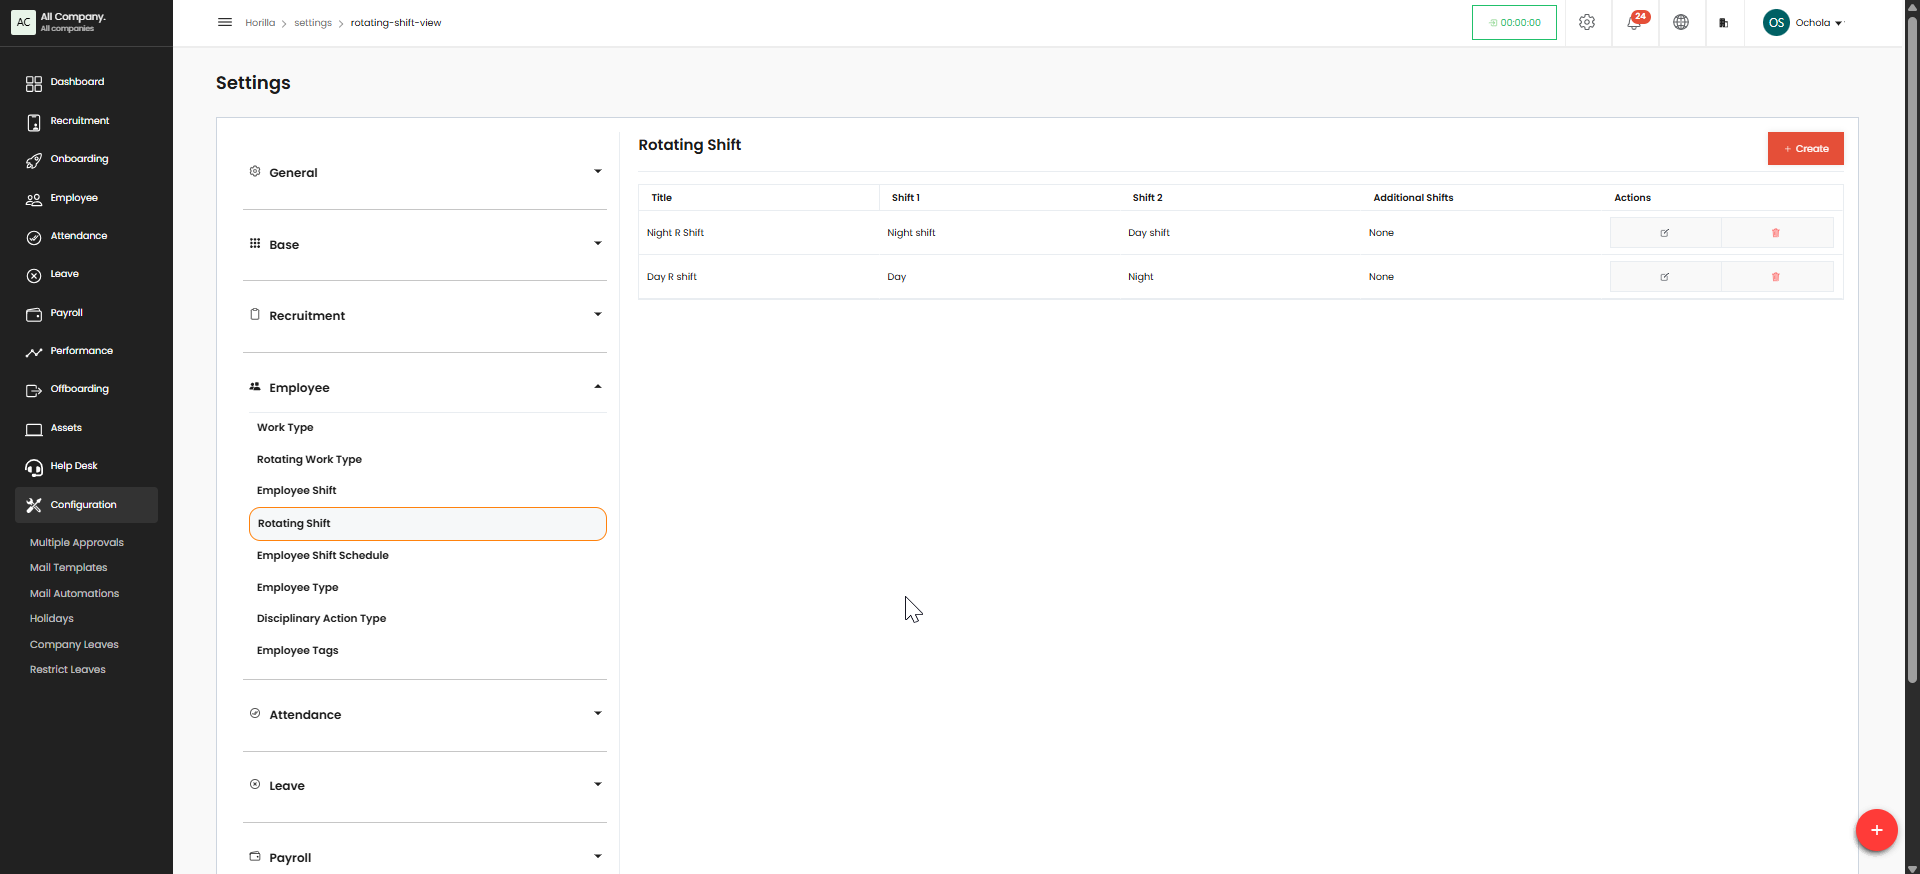
-
Click "Save" to create the rotating shift pattern
Managing Rotating Shifts#
- Edit a Rotating Shift:
- Select the rotating shift from the list
- Click the edit icon
- Modify the rotation details as needed
- Click "Save"
- Delete a Rotating Shift:
- Select the rotating shift from the list
- Click the delete icon
- Confirm deletion when prompted
Employee Shift Schedule#
Accessing Shift Schedule Settings#
- Navigate to Settings → Employee → Employee Shift Schedule
Creating a New Shift Schedule#
- Click the "
Create"button - Define the schedule parameters:
- Schedule Day
- Date Range (Start and End dates)
- Company
-
Shift Assignments
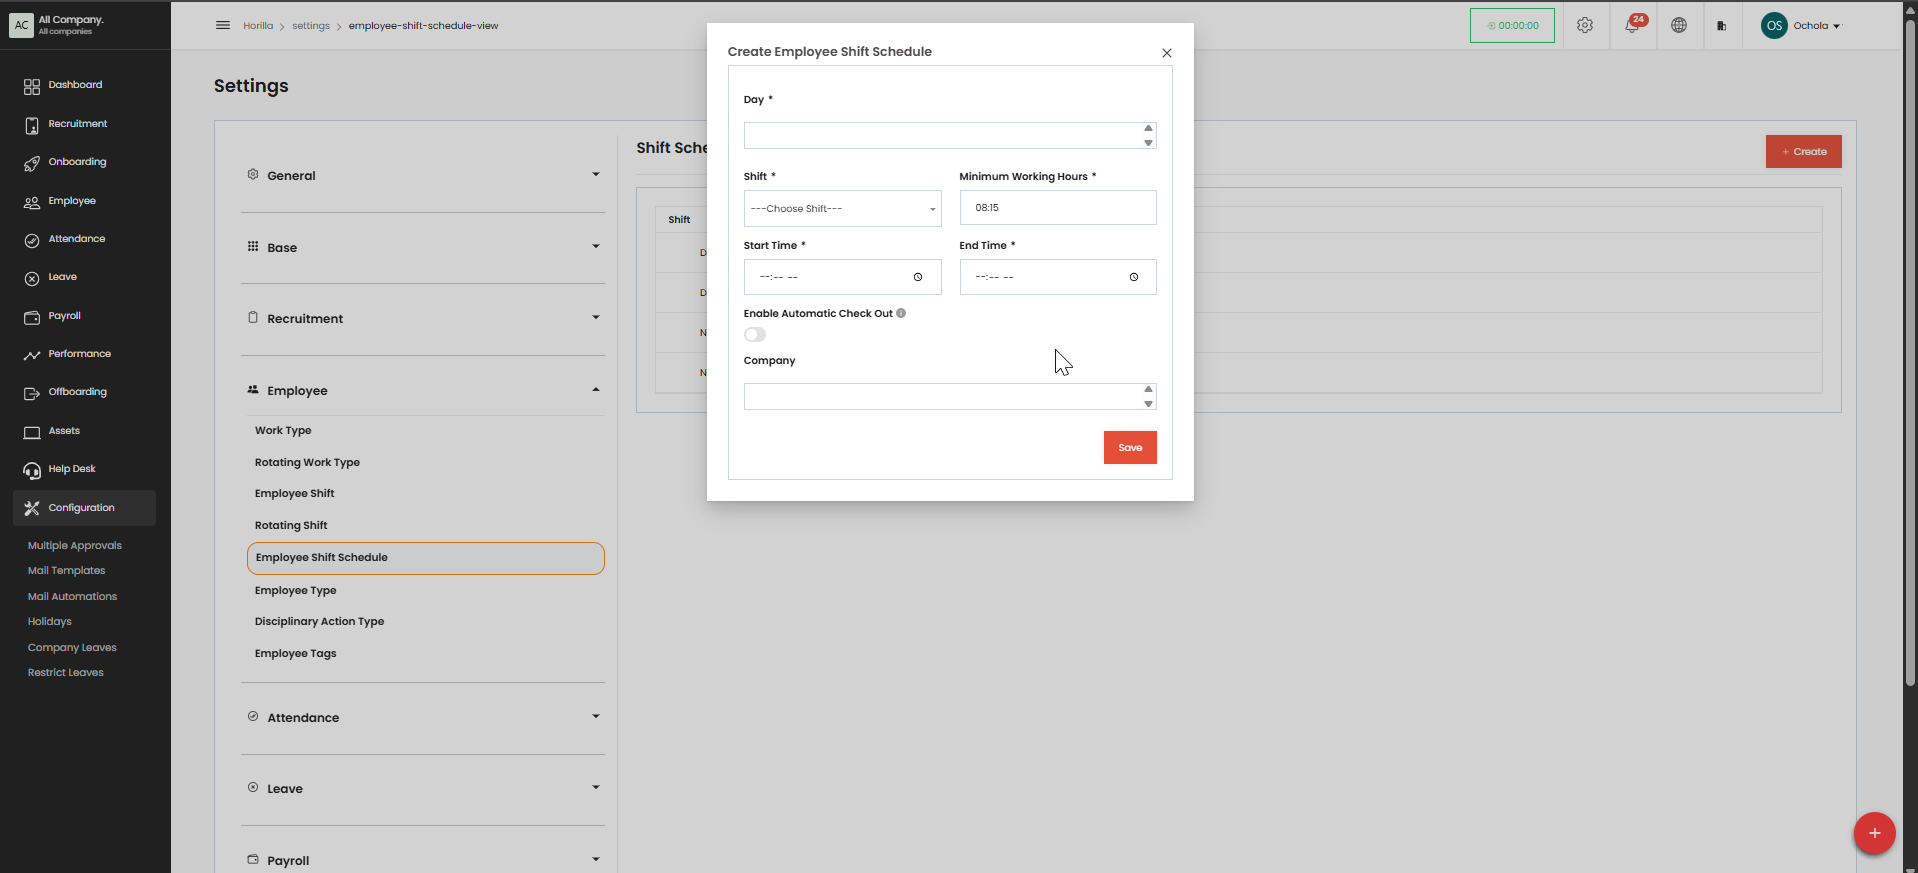
-
Click
"Save"to create the schedule
Managing Shift Schedules#
- Edit a Schedule:
- Select the schedule from the list
- Click the edit icon
- Update schedule details as needed
- Click "Save"
- Delete a Schedule:
- Select the schedule from the list
- Click the delete icon
- Confirm deletion when prompted
Employee Type#
Accessing Employee Type Settings#
- Navigate to Settings → Employee → Employee Type
Creating a New Employee Type#
- Click the "Create" button
- Enter the employee type details:
- Employee type (e.g., Permanent, Temporary, Intern)
-
Select company
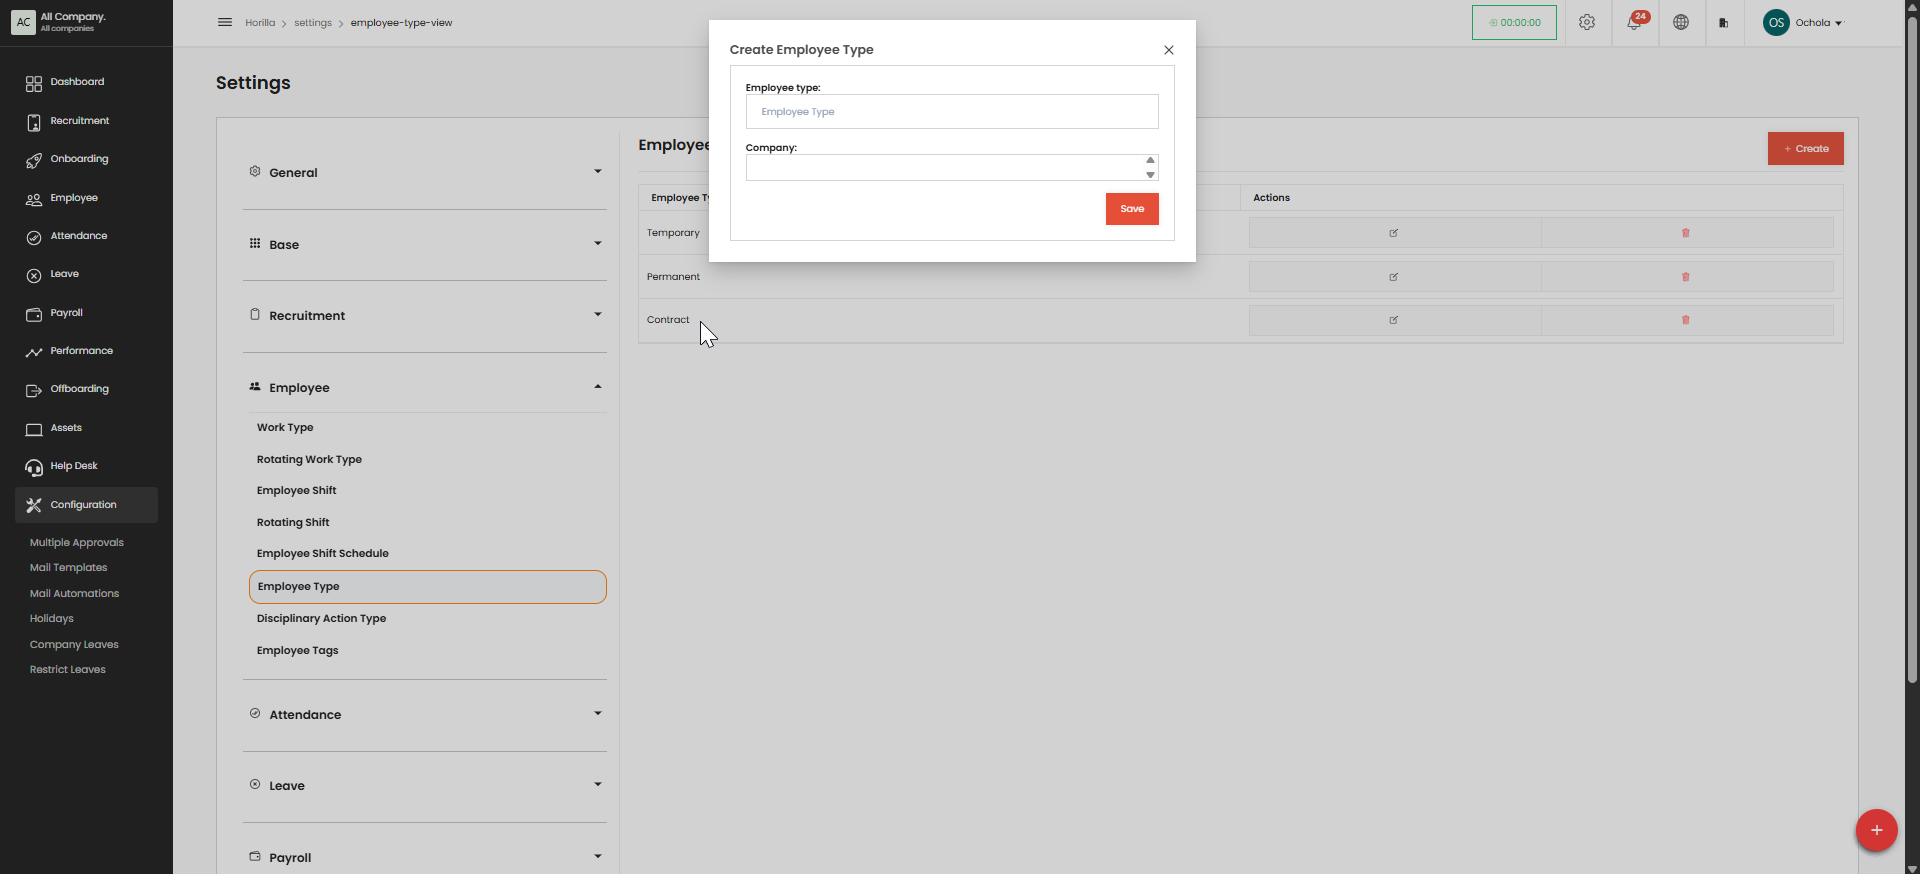
-
Click "Save" to create the employee type
Managing Employee Types#
- Edit an Employee Type:
- Select the employee type from the list
- Click the edit icon
- Update type details as needed
- Click "Save"
- Delete an Employee Type:
- Select the employee type from the list
- Click the delete icon
- Confirm deletion when prompted
Disciplinary Action Type#
Accessing Disciplinary Action Type Settings#
- Navigate to Settings → Employee → Disciplinary Action Type
Creating a New Disciplinary Action Type#
- Click the "Create" button
- Enter the action type details:
- Action type Title
- Action Title (e.g., Verbal Warning, Written Warning)
-
To disable login of suspended employees, check the
Enable login block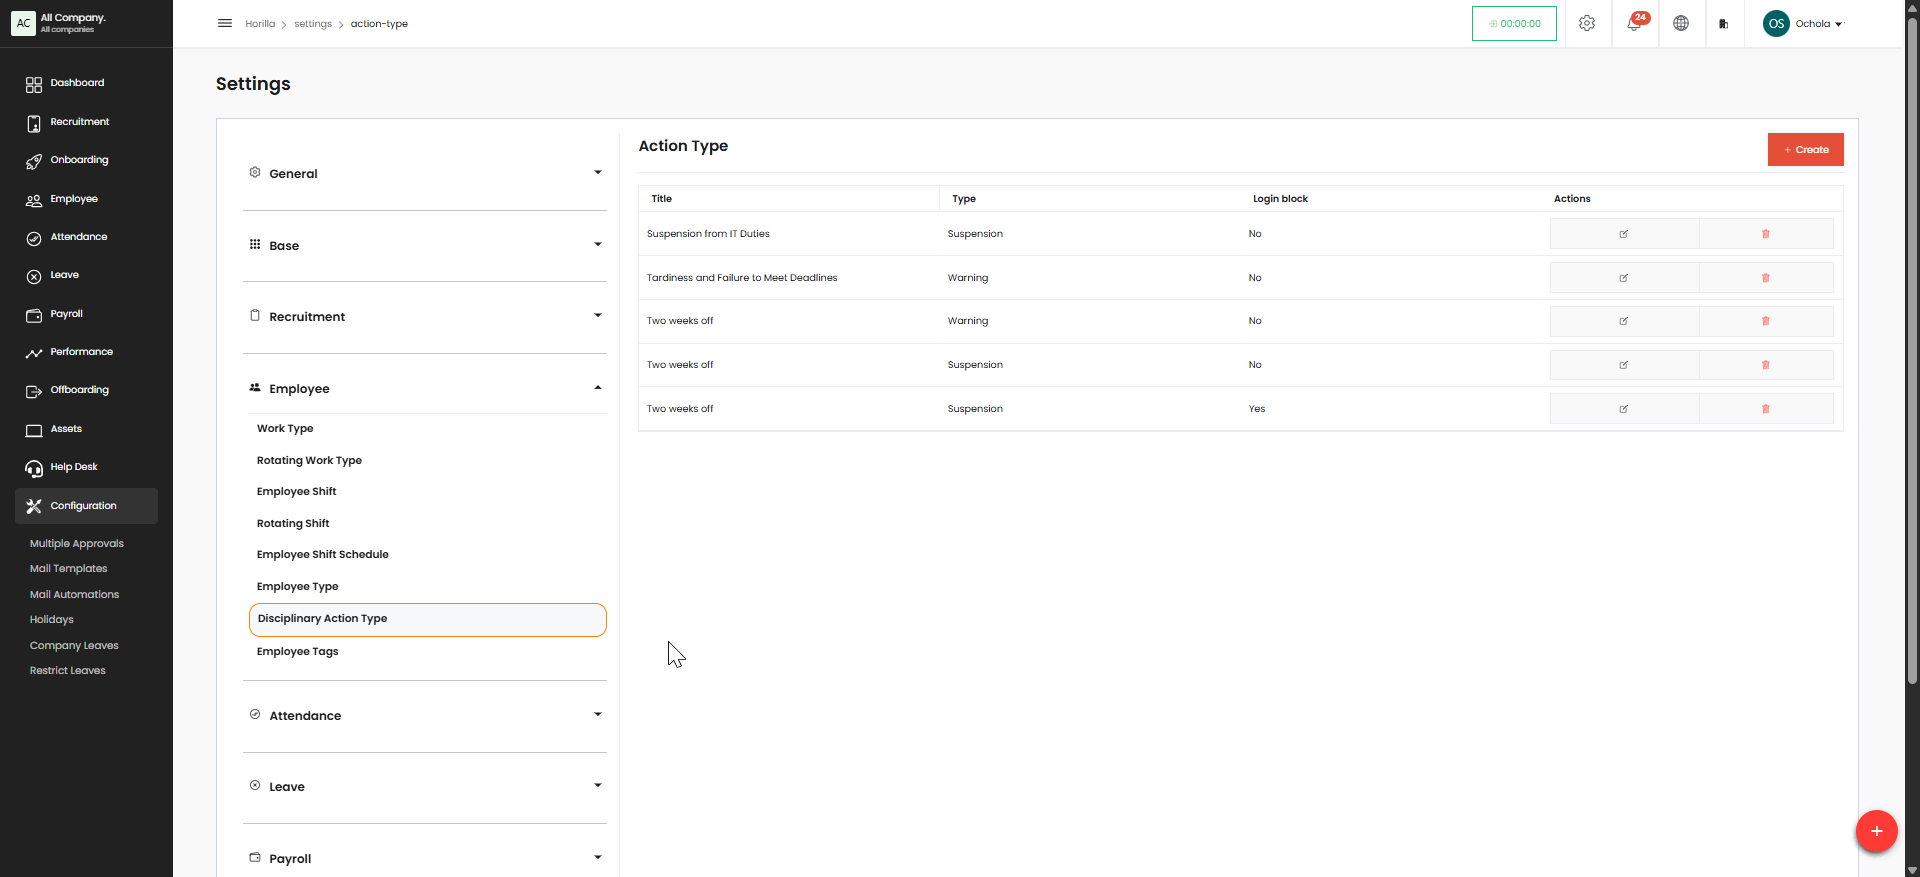
-
Click
"Save"to create the disciplinary action type
Managing Disciplinary Action Types#
- Edit an Action Type:
- Select the action type from the list
- Click the edit icon
- Update details as needed
- Click "Save"
- Delete an Action Type:
- Select the action type from the list
- Click the delete icon
- Confirm deletion when prompted
Employee Tags#
Accessing Employee Tags Settings#
- Navigate to Settings → Employee → Employee Tags
Creating a New Tag#
- Click the "Create" button
- Enter tag details:
- Tag Title (e.g., Remote Worker, Project X, High Performer)
- Color (optional)
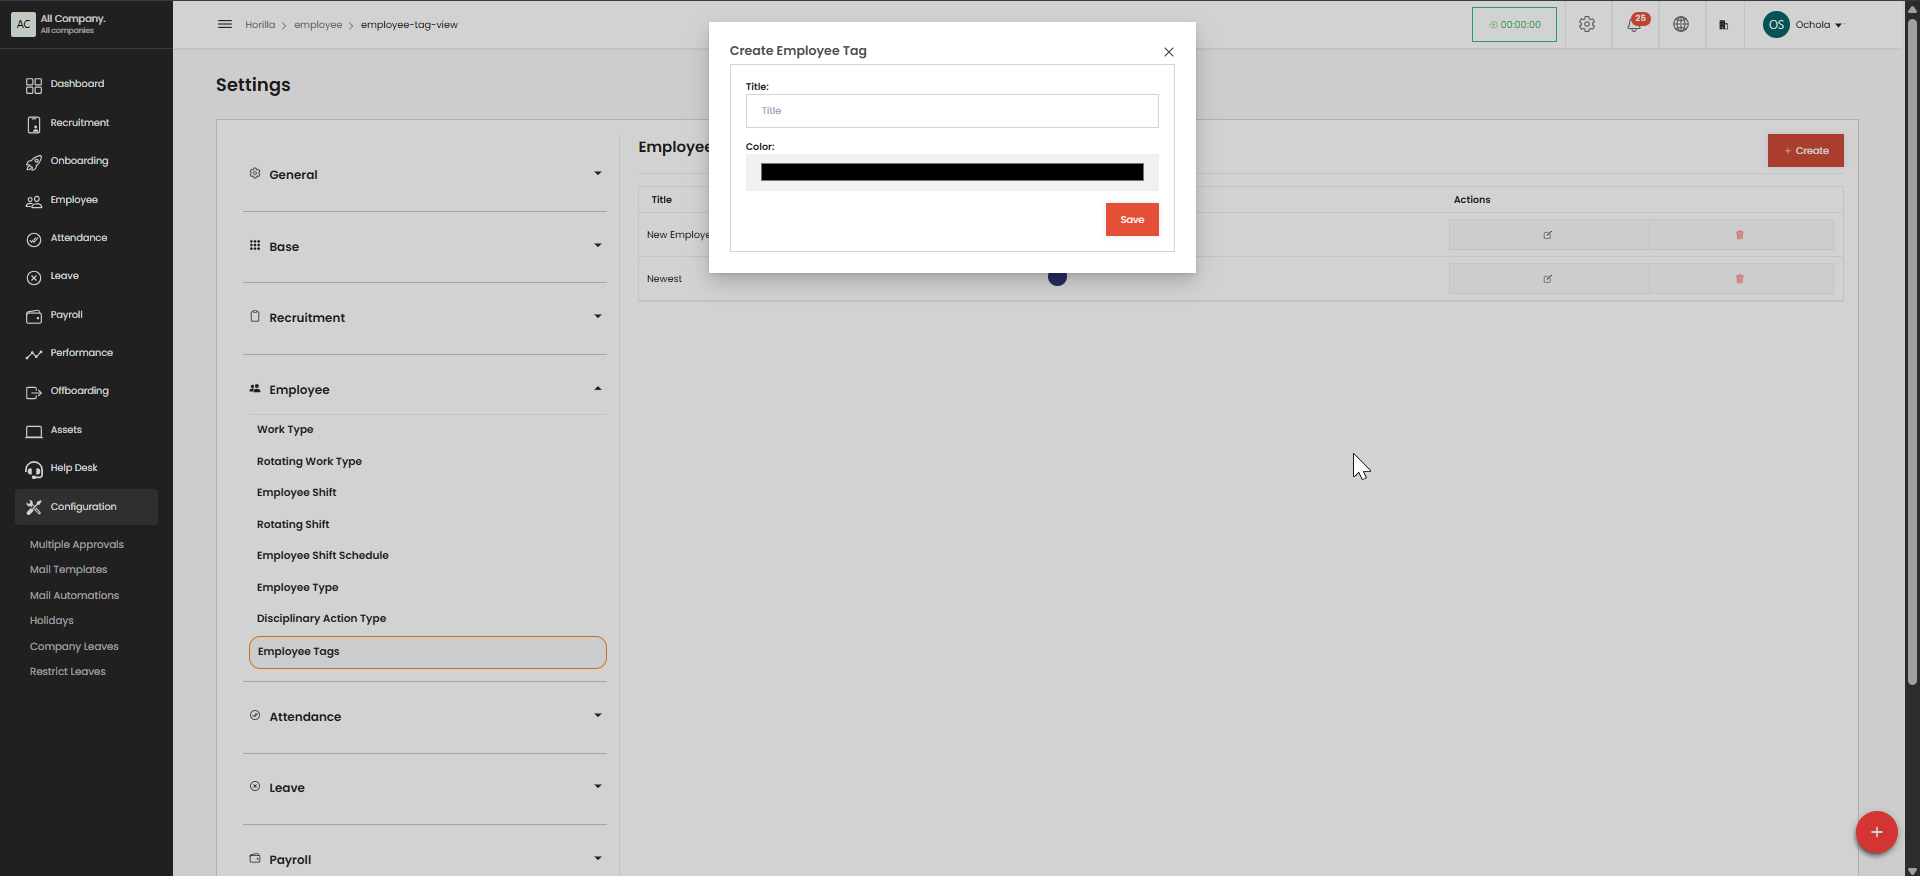
- Click "Save" to create the tag
Managing Employee Tags#
- Edit a Tag:
- Select the tag from the list
- Click the edit icon
- Update tag details as needed
- Click "Save"
- Delete a Tag:
- Select the tag from the list
- Click the delete icon
- Confirm deletion when prompted
Important Notes#
- Tags are useful for filtering employees in reports and searches
- Tags can be used for temporary grouping without changing organizational structure